So now that Christmas is over I can show you a few things I made for others without giving away the surprise.
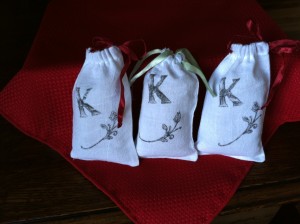
Today we will start with these personalized cedar sachets I made as a small gift. These are pretty eco-friendly/sustainable since everything but the filling was stuff I had on hand.
I started with one of the left over flour sack cloths we spoke about yesterday that I used to create the produce bags and followed the same process just making the bags much smaller (and using narrower Stitch Witchery – 1/4 inch). If you don’t have time or don’t want to deal you could also use store bought muslin bags. For sizing I used a small note pad as my template and cut out a few rectangles making sure the top of the rectangle had the pocket edge.
For the personalized part of this, I wanted to stamp the bags with the letter “K”. Seems simple enough. So I go to the craft store where you can find 784 stamps that you don’t want. And since I didn’t want to pay $35 for the whole alphabet in a font I didn’t like I headed to the wood working department. Here they sell individual wood cutout letters for about 40 cents a piece. I bought three as insurance. You know if I had bought just one I would have broken it right away.
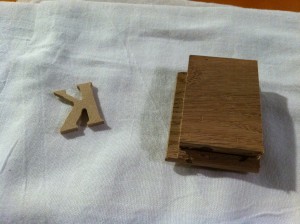
When I got home I looked around for a scrap of something to use as a handle. Low and behold I have little scraps of wood from installing our floor that needed a use. (By the way, I was laughed at when I said I wanted to save them.) So here we have our letter and our block.
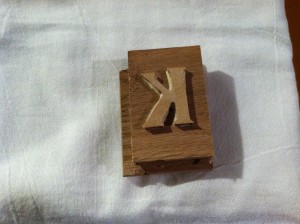
Glue the two together using wood glue and then put something heavy on top to act as a clamp. Wait a few minutes and you will have your very own stamp. Just remember to glue it down in the wrong direction so when you stamp it’s in the right direction.
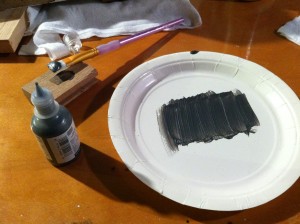
For the “ink” I used fabric paint that I poured onto a leftover paper plate from a party. (I don’t buy them anymore but since I already own them at least make them useful, right? They are great as paint trays for small projects especially if they are coated. After you are done leave them to dry and use again.) Smooth the surface with a paint brush then put your stamp in like a stamp pad.
I practiced a few times on some scrap since I didn’t really know if it would work. Then it was onto my little satchels. Before you stamp, put a piece of cardboard inside so the paint doesn’t seep through to the back. I found that it worked better if each time you dip your stamp, you smoothed out the paint. On these bags I also added a flower detail so the K wasn’t all alone. Then let dry overnight.
For the filling I used cedar chips but you could could use pine needles or potpourri or whatever you’ve got and like the smell of. To close the top, thread some nice ribbon through the pockets made from the hems and make a bow.
A simple, pretty project that can use up the odds and ends from other projects. You would be amazed at the things you can make out of the parts most people throw away.


