
So let’s get back to some furniture makeover, shall we? I have a backlog of wonderful projects to show you that I have finished but haven’t posted about yet. I am blaming this tiny child to be for using up all my energy.
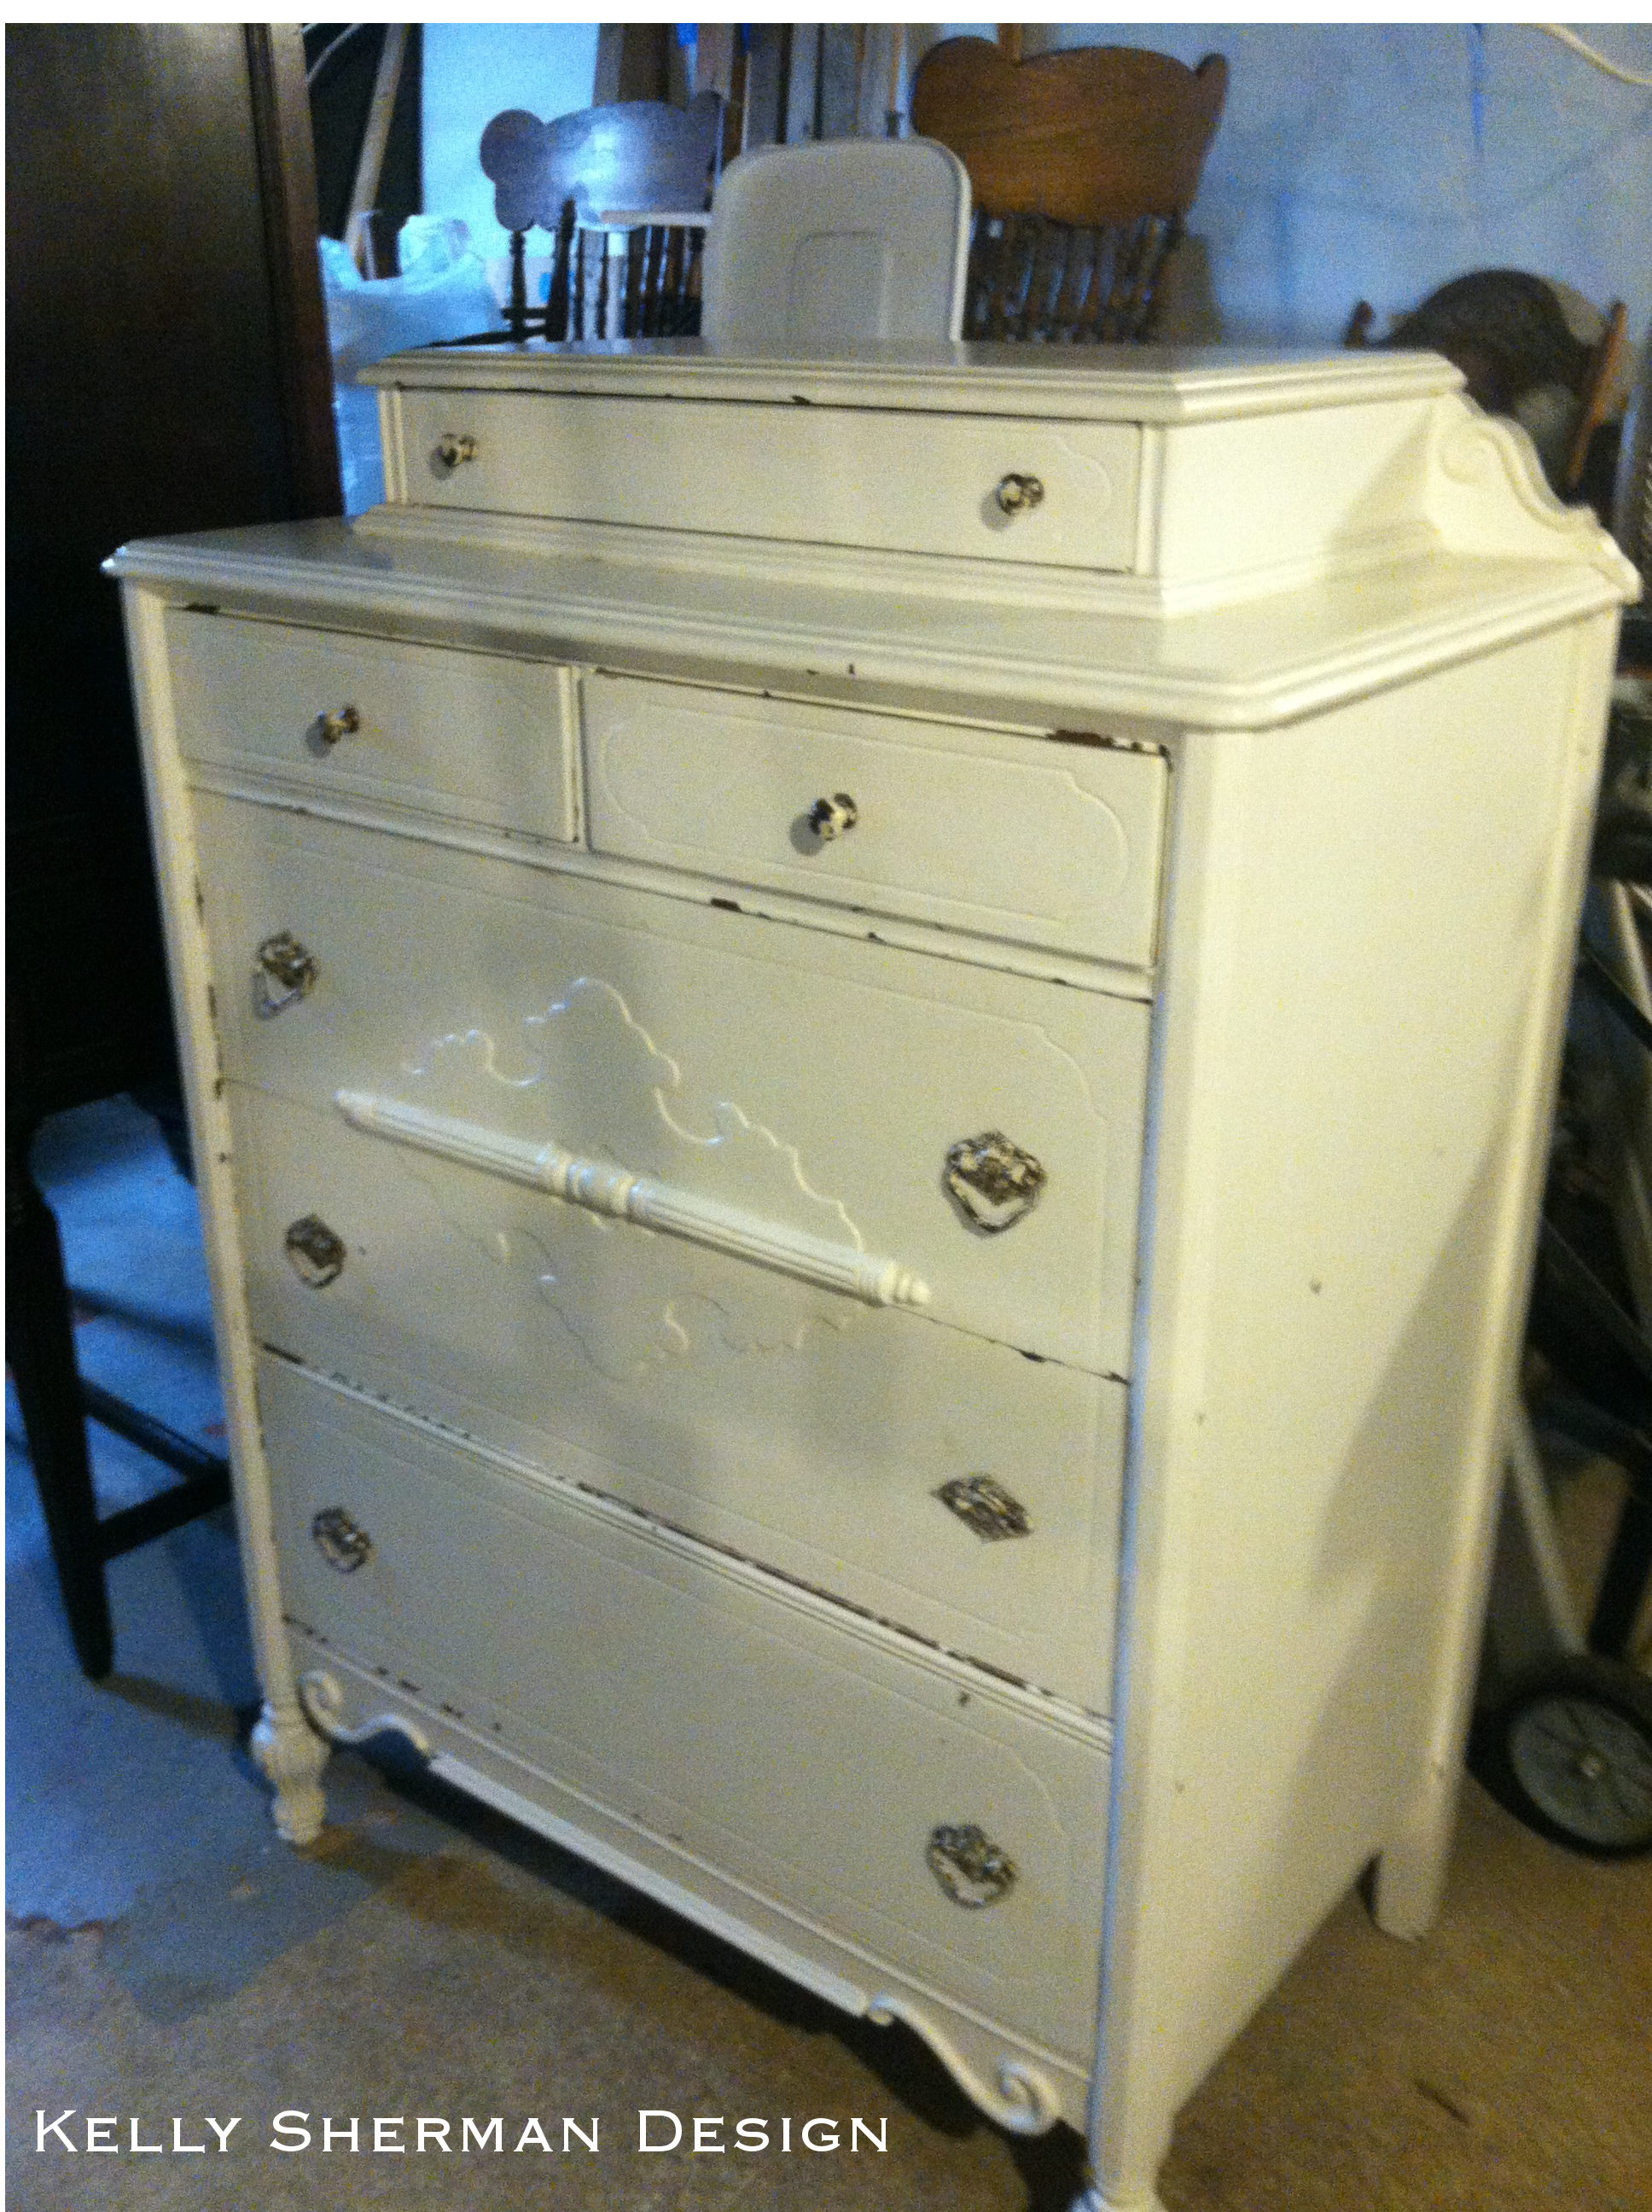
Today I bring you one of my favorite makeovers ever. I had received an email with a picture of this dresser and was pretty excited. When I got to the client’s house to see it I fell in love. This dresser has such wonderful lines and details that you just don’t see anymore. This was from the same client as the now famous Tall Cabinet makeover and one other piece you will see soon. We had worked out what the plan was with those two but this dresser was more of an adventure. I suggested we strip of all the layers of paint and see what we got and she was game. It’s my favorite kind of client who is along for the adventure.
So here is the before picture.
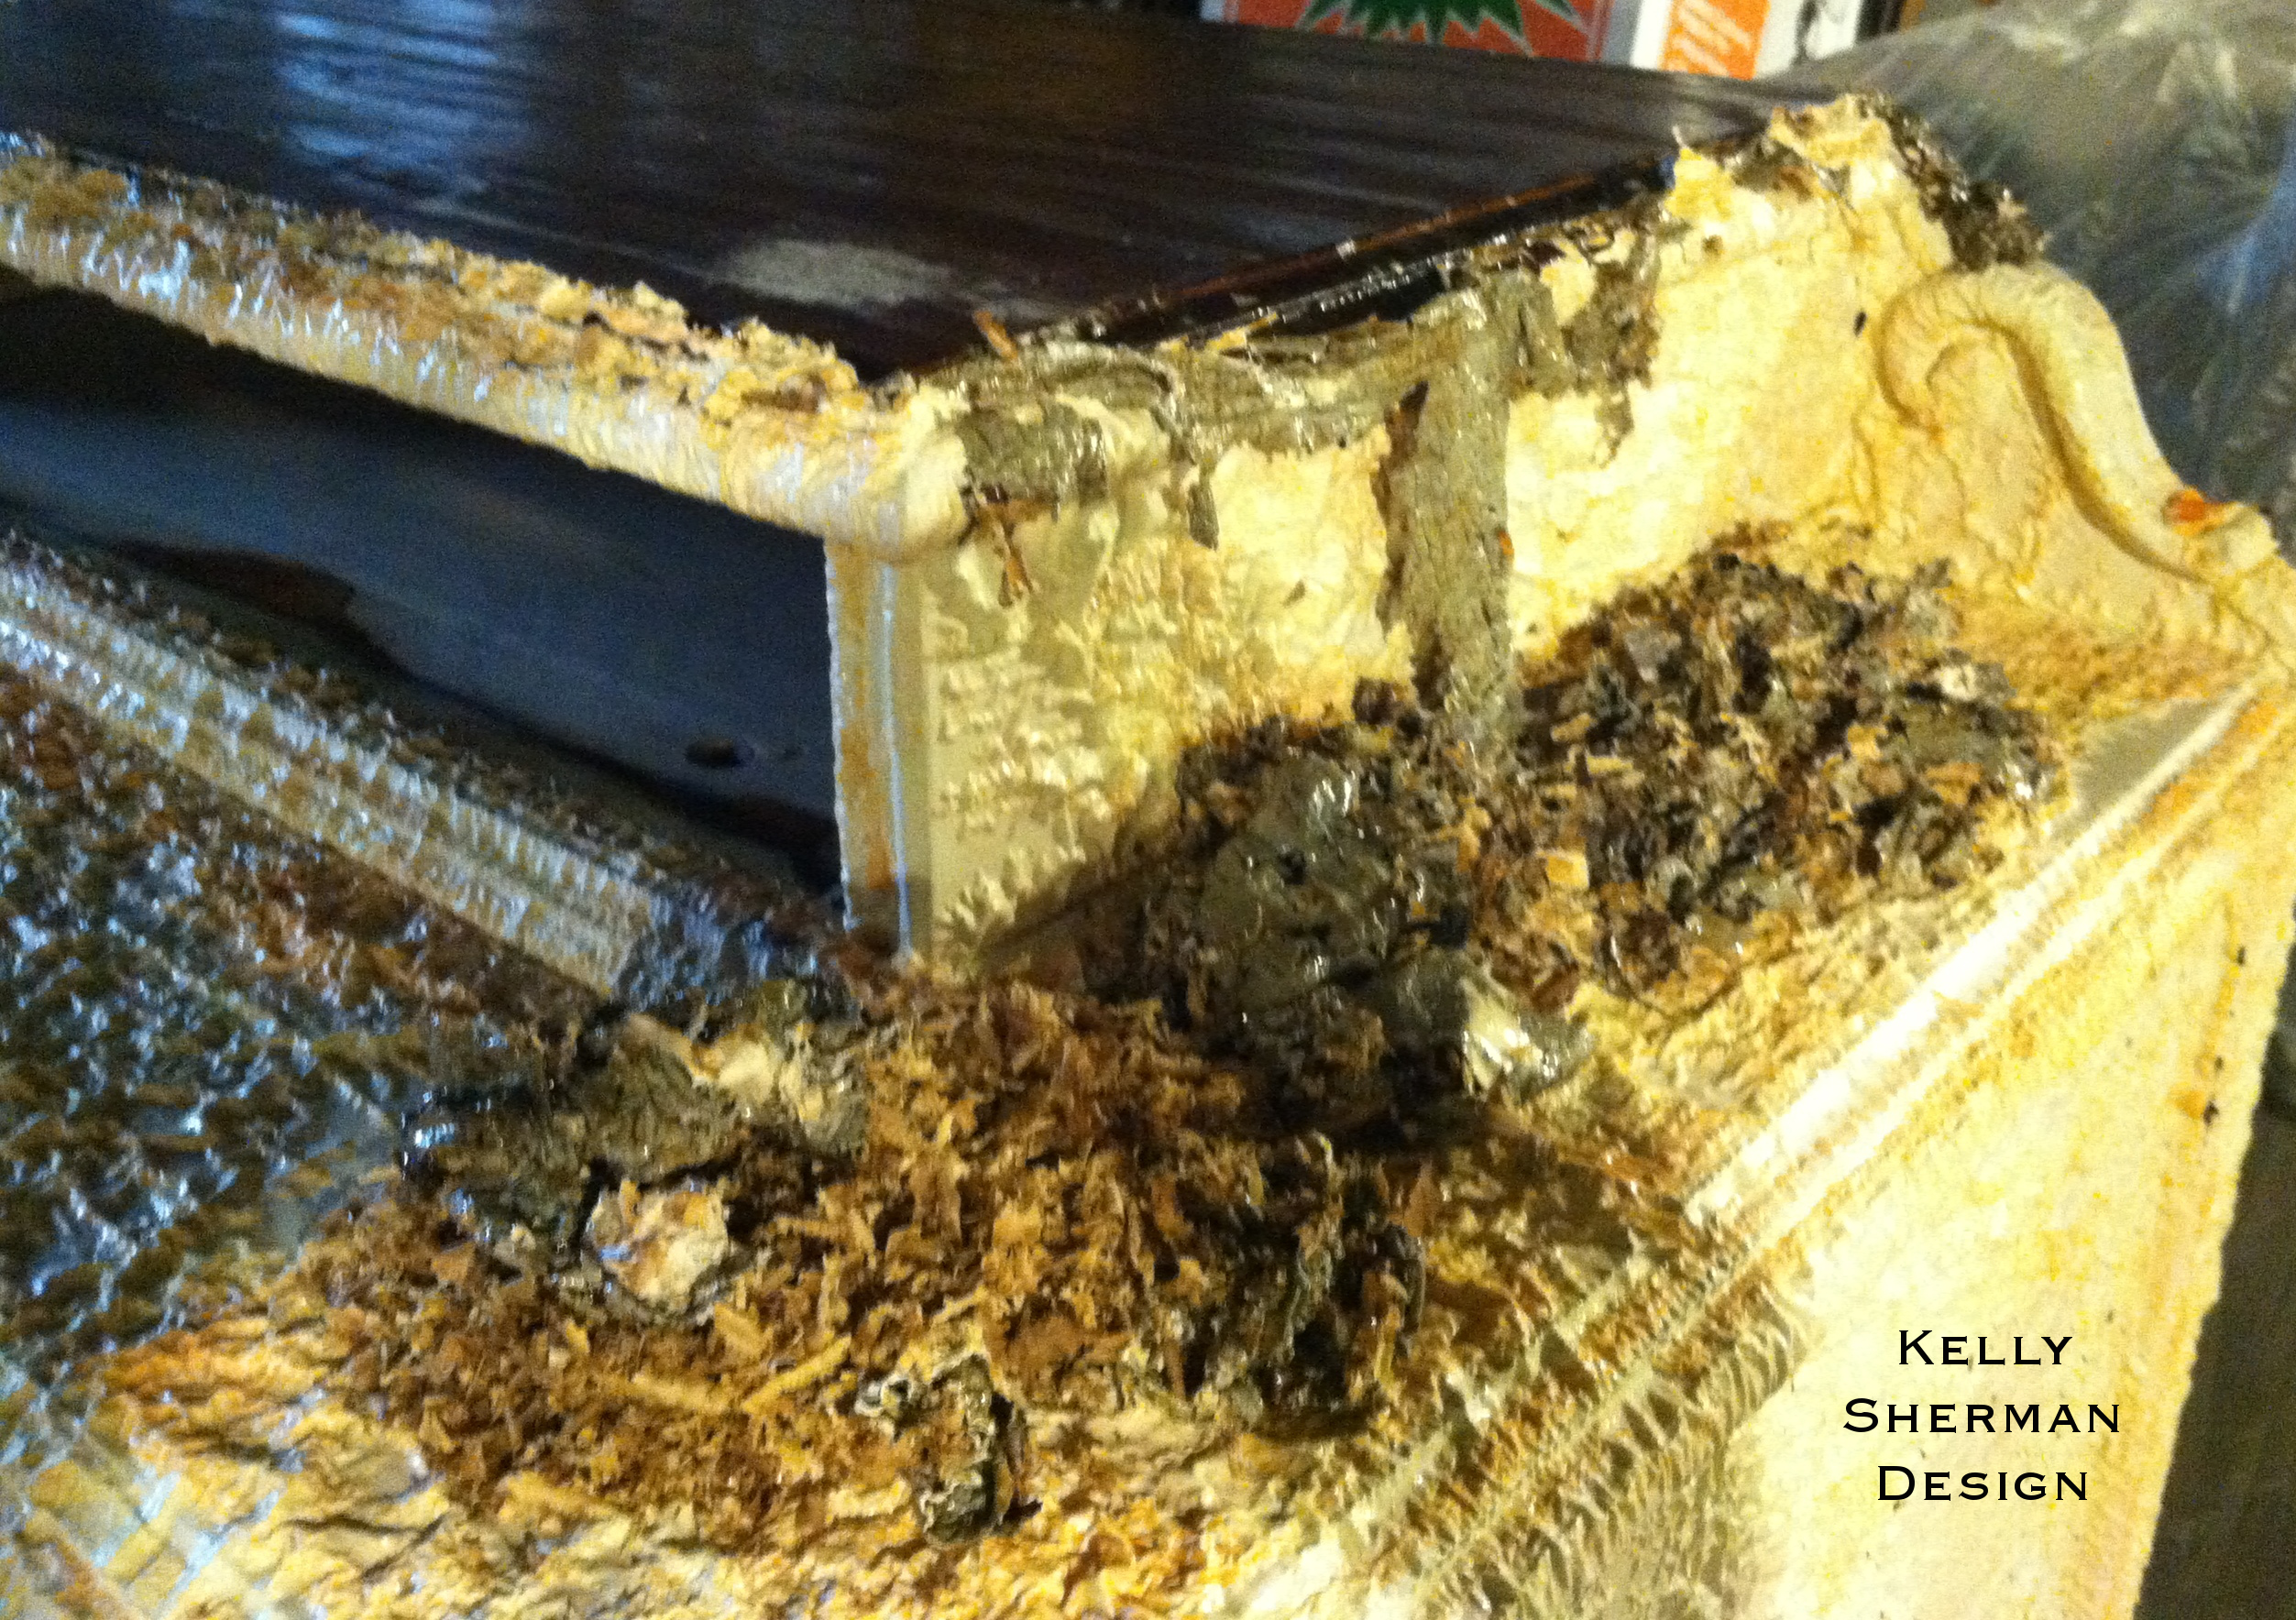
Once I got this back to the shop I couldn’t wait to douse the thing in SoyGel. In order for any paint stripper to work you need to leave it alone to do it’s job. I kept sneaking over and trying to scrape little sections to get a sneak peak. The coolest part was how everything started changing colors as the SoyGel ate through the layers of different colored paint.

Once I started scraping the old paint off you could see there were tons of layers. I am guessing at least 7 or 8 judging by the different colors. I will say I was very impressed with the Soygel which got through all those layers easily. In fact the goo became so heavy that the paint layers were just falling off in sheets.
After seeing what was underneath I called the client to come take a look. We both agreed that what was underneath was so beautiful that it shouldn’t be fussed with. We decided to let the wood show through and just use the clear Polywhey in a satin finish.
And here is the after.
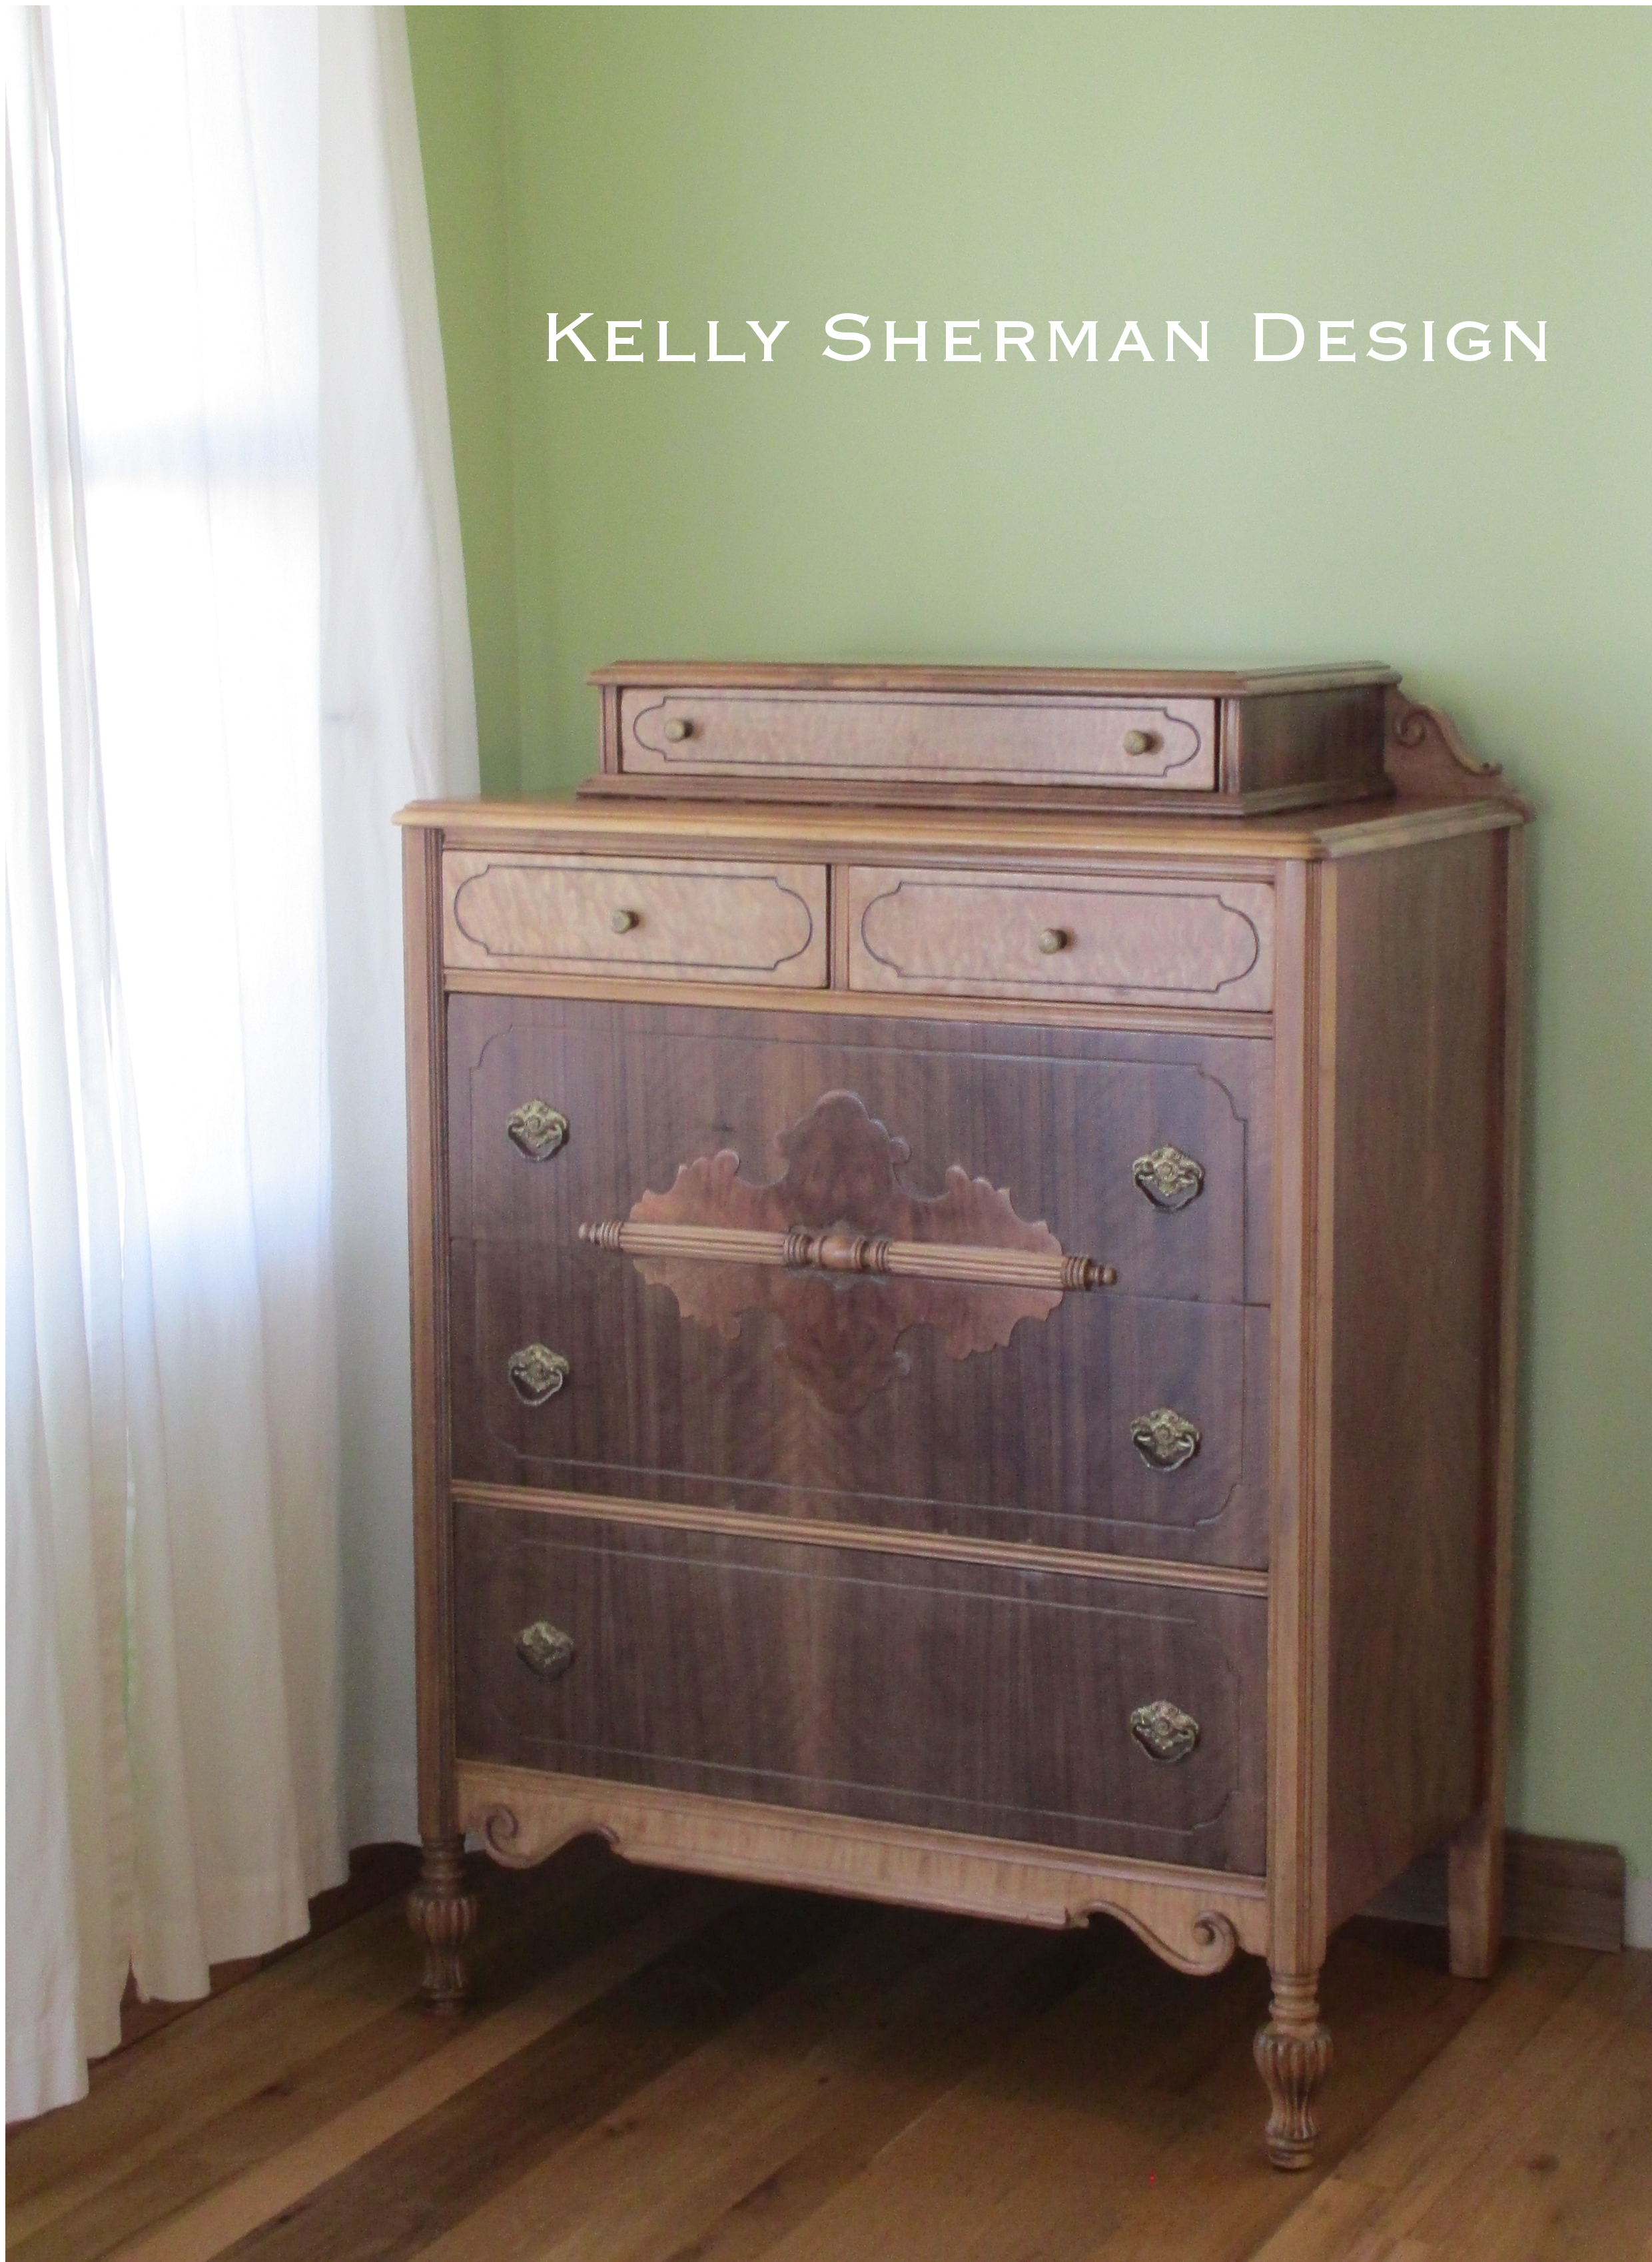 All of the different colors on this dresser are just different kinds of wood. I didn’t use any stain. The drawers look to be one sheet of veneer (walnut?) that goes across the big drawers. The smaller drawers and the very bottom all match with a burled wood. The detail on two of the larger drawers is yet a different burled wood. I wish I was better at identifying wood (I am working on it) but it looks like at four types were used here.
That by the way is the original hardware. I just put it all into a small tray and brushed on some of the SoyGel. Once it had sat for a bit I took a soft toothbrush and lightly brush all the paint off. I covered with a coat of wax and buffed it up.
This is one of those projects I start out excited about and then fear sets in. This is a beautiful piece and I start to worry if I can do it justice. I sat with dental tools making sure all the paint was out of the crevices. It really deserved putting in the time and not just throwing another coat of paint over it.
Thank you Theresa for allowing me to find out how pretty it was under all the layers
Linking up at:

Oh. My. GOSH!! That turned out so beautifully! Nice job! Good for you for being patient – that’s one I’m still working on. 😉
Thanks Lindsay! I am still working on being patient myself. Sometimes I have to remind myself to walk away!
beautiful transformation and amazing work you did with this dresser! 🙂
glad to have stopped by today from The 36th Avenue party!
Ingrid
Ingrid – thank you for stopping by and for your kind words!
Sometimes a piece of furniture is just not made for painting! The original look is lovely 🙂 {I must check our stores for the SoyGel – seems like an amazing stripper!}
Linda – Thank you for stopping by! Soygel is pretty awesome and the only paint stripper I use. I really need to do a tutorial. It’s much less toxic, you can use it inside and it won’t burn your skin. None of the stores around here sell it so I go to Amazon which seems to have the best price.
Okay, I am so used to seeing these transformations go the other way…from stained to painted. I am so glad to see someone return this beauty to it’s original splendor!! I am a Victorian soul and love stained furniture so I have to commend you for a job well done!
Hugs,
Debbie
Debbie – thanks so much!
Very gorgeous! What a great decision to let that wood be on display! I’m dropping by from Whipperberry. Love this!
Denise – Thanks! This is my first time at Whipperberry!
What a lovely piece! So glad that you rescued her and uncovered her beauty!
I’m so glad you took this beauty down to her natural state. Some things just don’t need covering up with paint. 🙂
WOW! Good for you for having such patience. Years ago I used to strip furniture and the waiting part is so hard. I have not heard of SoyGel but plan on saving this idea for the future. To have it bubble up so that the paint fell off in sheets says a lot about the product. And the result? You brought out the beauty of this piece and made her shine!!
You made the right choice with this and it’s gorgeous!!
Now I need to find some of that Soygel stuff! I had a table that I had to give up on because after 3 attempts with stripper, a BELT sander and many other means, I had to throw in the towel. It would be nice to give it one more go with that.
Thanks all for stopping by! The big thing with Soygel is to let it sit. I typically will brush a think layer on at the end of the day and let it sit overnight. When I get up in the morning it is a lot easier to remove and it comes off in sheets instead of a gloppy mess. Good luck!
wanted to invite you to my link party where we pin all those who join to our party board
http://myfashionforwardblog.com/2013/05/23/all-things-pretty-9/
I would love for you to share and link up at my TGIF Link Party. The party is open every Thursday night and closes Wednesday’s at midnight.
http://apeekintomyparadise.blogspot.com/
Have a wonderful week!
Hugs, Cathy
Gorgeous when you can get all the way down to the wood. Beautiful! Thanks for sharing. Great job. Linda
o.k. this is my 2nd attempt at commenting. Hope it works. lol! The dresser is a real beauty. Love all of the different woods! I know it was a lot of work getting everything out of the crevices. Can’t believe what a great job the gel did. I just painted my old Hoosier white. Really had a hard time deciding to do this. I have used it for years as oak. We just finished our basement and it just didn’t cut it with the flooring. Hope I don’t regret it. Looking cute so far. My daughter saw it last night and loved it. That’s a good sign. I do think some things need to be left as is. Good to know that long after I’m gone if someone thinks, “What was she thinking?” that the one layer of paint can be removed. Thanks for sharing with Share Your Cup.
hugs,
Jann
That is a BEAUTIFUL makeover! The wood underneath is so very special – well worth the effort.
Thanks for linking up!
Sarah @ A Cat-Like Curiosity
This is beautiful! Thank you do joining Home Sweet Home.
Sherry
amazing! I’ve never heard of SoyGel! It looks like it did a fabulous job. 🙂
catching you!
gail
Wow, that is just beautiful!
Wow, this is absolutely stunning! The combination of different woods is beautiful – definitely worth all the hard wok you put in 🙂
~Katie
Hi Kelly, new visitor here, from It’s Overflowing. The dresser turned out beautifully. I’m sure your client is tickled. I’ve been wondering when I would start seeing people strip again, instead of just slapping another coat of paint on. Not that I don’t love the paint, just that you were right about this one…it NEEDED to be left alone. Well done!
Debbie
Thank you all for stopping in and welcome to all the new folks. I really love reading all the lovely things you guys say. They will keep me going the next time I want to give up and throw something out the window!
Wonderful work. Can you tell me how long it took and what your stripping tools look like? I always have issues with the nooks and crannies. How many layers of stripping did you do? Thanks!
I use Soygel mostly because it’s a lot less toxic than the majority of products out there. I try to chose the most of ecofriendly and safe products I can. The other reason I use it is because it really works. I will usually slather on a good coat before finishing up for the night and let it just sit. In the morning the top has dried out just a little so it scrapes off without being so sticky. As you can see in the pictures it comes off in sheets cleanly from the wood. The only problem with it is you can’t find it locally. Franmar, the maker, and Rockler sell it but I find the best price is usually on Amazon.
Cooks – It took one good layer of Soygel that I let sit overnight and a few spot touchups but very few. It took me a few hours of actually scraping and cleanup. The hardest part is letting it sit and do the work so you don’t have to.
Thank you for taking the time out to reply in a thoughtful, informative and swift manner. I appreciate bloggers like you!
Cooks I appreciate readers like you! Let me know if you have any other questions.
Also, is there any particular reason you used Soy Gel? I have never seen this brand in my local Home Depot or Lowes. Thanks.
I use a few things to scrape. I bought a set of dental tools (they may be for clay sculpting though) for $15 online and they are awesome. They get right into the cracks and crevices. I also use standard putty knives but my main scraper has a handle and the blade is perpendicular to it (like this one). I find that you can get a nice amount of pressure but have more control so you don’t slip and slice your arm off!
Great job on the dresser. But maybe you can add which products you used, I know you mentioned SoyGel, was there anything else? I’m getting ready to do my first make-over project and gathering up as much information as possible. Thanks.
One of the nice things about Soygel is it eats throught the paint and not plastic. I use an ols plastic shower curtain as a dropcloth (which can be hosed off and used again). A scraper and dental tools will help make things easier. My biggest secret? Once the stuff has cooked and you are ready to scrape, sprinkle the surface with saw dust. As you scrape it will soak up the moisture and help keep your tools clean. If you sprinkle enough on the dropcloth as well you can just sweep up all the old paint instead of having goop everywhere. Much easier to clear up! Good luck and let me know if you have any questions!
Wow, that is amazing! The dresser is gorgeous, great job. I have a vanity that I’ve wanted to strip for a long time, but I know there are at least 10 coats of paint on it (mostly from me). I’ve been too scared to try until I saw this. Maybe it could work after all? I am a little nervous that I might do all that work and find veneer under all the paint…probably not since it is from the 20’s-40’s (it was my grandmother’s), but you never know. I just discovered your blog thanks to Design*Sponge. I love it and have already added it to my reader! 🙂
Libby – All the different woods you seen in the picture are veneer. It was used a lot in very nice furniture over the years and isn’t a bad thing. When stripping veneer be careful not to get your scraper under the edge so you don’t pull it off. And since you can’t sand it as much as you can with a solid piece trying to get the paint out of the grain can be tricky. Check out this desk to see how I dealt with paint in the grain.
What is the best way to apply the Poly? I have a dresser that I painted yellow but am wanting to transform back to natural wood. When I applied poly once it came on kind of bubbly and I want it to be nice and smooth 🙂
Great great job!
Nina
Nina, This is how I do it. I first sand with 320 grit sandpaper sponge to get everything smooth then wipe down the dust with a damp rag (for water based poly only). You will want to use a good (not cheap – it matters) brush and stir don’t shake the poly to mix. Ideally you will slowly drag you brush across the surface and the poly will magically apply in a mirror like finish like in the commercial. It rarely does for me! Since I use water based poly I like the surface to be a little damp (from when you wiped the dust off with the damp rag) when I apply it so it gives me more time to work before it dries. This helps if you have to lightly brush over the surface again to get any bubbles out or to even out a drip. Just do it quickly and move on so it has time to even out before it dries. Once dry for a few hours, repeat the process starting with the 320 grit sandpaper which will even out all the bubbles.
Also important to note: don’t let your husband use a saw and kick a bunch of dust into the air right before you poly.
Beautiful. As a former redhead (now more silver) I’ve stripped a bit too much wood in my life, revealing mismatched or sad looking grain. That is a beautiful piece. I like Soygel too, but I’m still hoping to find something that gets stain out. I’ve come to believe only elbow grease and sandpaper work. You do impressive work.
Thank you! I agree with you on the stain, it’s a lot of elbow grease to get it off.
Pingback: Catch as Catch Can 124 - My Repurposed Life™